What is the ideal image resolution for a lightbox?
One of the most common problems people run into when selecting images for their lightboxes is getting one with the proper image resolution and file format. One of the biggest eyesores is when you select an image that appears pixelated once you print it out. However, the image you selected may have looked fine before you printed it out. So what happened? Let’s go over a few basics of digital photograph printing.
SELECTING THE RIGHT DPI
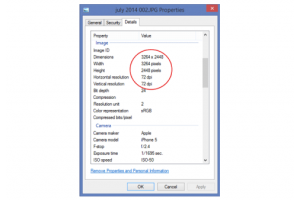
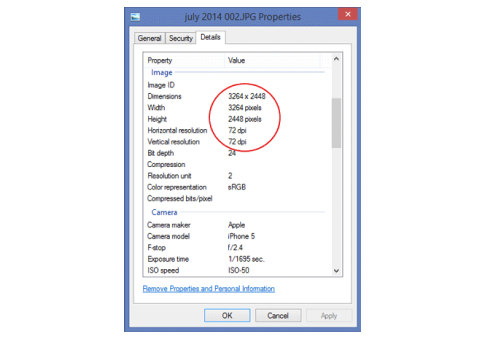
DPI is a common digital photography acronym that stands for Dots-Per-Inch and is a measurement of how many pixels (or “dots”) are packed into each square inch of print space. The higher the DPI, the greater the fidelity of the print job. To find out what your DPI is, simply right-click on the digital photo and click “Properties”. There’s a little tab on the top you’ll click on called “details.” From here, you can see all the properties the image has.
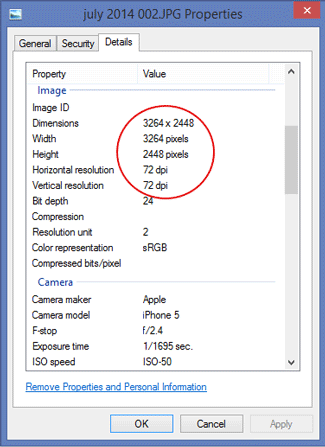
Take a look at the image properties here. The resolution is really high, which is really great. However, the actual resolution per square inch is only about 72dpi. You’re going to find that the image looks much better on your phone or computer screen than as a physical print with this resolution. An image that has an acceptable resolution will be around 300dpi. The good news is that the image we have isn’t necessarily lost. Since it has such high dimensions at 3264×2448, we can simply put the image in Photoshop or another professional photo-editing program and resize it, manually adjusting the DPI up to 300. This is not ideal, and many photographers recommend against this, but it is one of the very few ways you can save a low-resolution image. The only time you can really ever get away with this is when you have a sufficiently large photo like this. So, if 72dpi is so low and unusable, why do images usually default to this? Well, one reason is to save space. This particular photo example was taken with an iPhone 5, and we all know space is quite limited on phones. Another reason is that most photos taken with digital devices will be uploaded onto computers and will never be printed. At 72dpi, they may not look great printed, but on a computer screen, they look just fine. If you plan on printing photos, it’s best to go into the settings on your camera and select the appropriate resolution in which you want your photos to be taken in the first place.
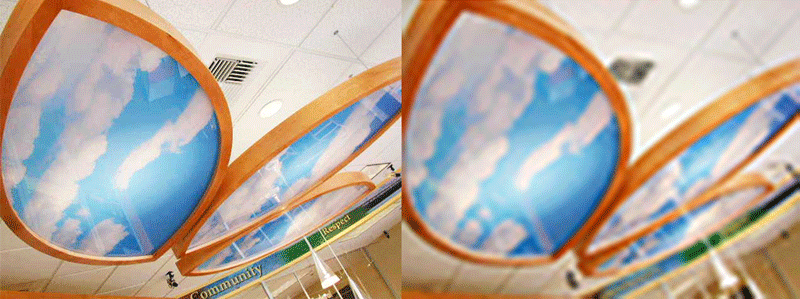
The above picture is a pretty extreme example, but we wanted to demonstrate a little better what a low DPI does to a photo. The picture on the left, taken from our own site, is at a standard 72dpi that you normally see on web pages. The one on the right is set at 10dpi. Not only does the picture look fuzzy because you lose quite a bit of the sharpness and clarity, but the colors don’t seem quite “right” either. This also demonstrates that if we wanted to print the picture on the right, there’s no way to fix it in this state and print it at 300dpi. You can’t add quality that isn’t there. The only time this could potentially work is if you have an image that is sufficiently large in dimensions, and this image is, unfortunately, too small to work with.
SAVING IMAGES IN THE RIGHT FORMAT
Remember how we said that most images taken with digital devices will never be printed but simply uploaded to a computer? Well, one of the defaults that your digital device usually has is to save an image as a .jpg or .jpeg file extension. The purpose of JPG image compression is to save space on your computer. Once again, this is great for things like websites, sending email attachments, and uploading Facebook pictures, but it’s not so great for printing. JPG images use a much lower color bit-rate, which, in the simplest terms, means that there are fewer color choices. So if there is a color pixel that doesn’t match up exactly with its color selection, it has to “approximate” what color it is, which means that it has to settle for the closest match instead of the perfect match. The best image format to work with is generally images that are saved in TIF instead of JPG. If you absolutely insist on using a JPG, it will need to be a very low-compressed, high quality photo. If you have a photo that measures 11" x7" and is only 300 kilobytes in file size, it’s probably far too compressed for use in printing.